Showing posts with label Tanks. Show all posts

Monday, February 29, 2016

Your punishment will be more severe

I missed out on buying a punisher cannon when they could be easily obtained through the various
bits-sellers, now of course the damn things are as rare as hen's teeth.  Since I want to try out Pask in a Punisher, I decided to build my own to go on my Ragnarok/Russ.

The mantlet was a spare demolisher mantlet that I had lying around, I attached a piece of  3/8" ID tube to serve as a mount for the gatling gun.  The gatling gun itself is 6 pieces of 3/32" tubing around a 1/8" hexagonal rod.  I added a couple of slices of the hex rod on to the mantlet to add detail to the spots where I cut off the demolisher cannon shock absorbers.  I added a piece of round rod to the hex pieces to give the look of a bolt.

I plan to leave the gatling gun removable so that the mantlet can be used to mount a battle cannon or  a vanquisher cannon as well.


And all painted up:


Tuesday, October 7, 2014

Ecclesiarch #3 WIP Update 2

Made great progress over the weekend, finished the sponson conversions, the missile racks and the servitors.

Tuesday, April 29, 2014

The nuclear option

"We got tactical smart missiles, phase plasma pulse rifles, RPGs. We got sonic, electronic ball breakers! We got nukes, we got knives, sharp sticks."

I originally built this to run as a Vortex Missile in Apocalypse games, I think it has actually gotten a shot off once (it seems to draw a lot of fire for some reason)   I may start including this beast  as a Deathstrike in my lists for the lols if nothing else.


The missile came with a playset that my wife got for my kid, he outgrew it but then Apocalypse came along and re-purposing occurred.


The launcher is an insert that slides into a generic Chimera chassis that has been host to a Hydra and/or a Colossus Mortar, I used a combination of plastic tubing the mount from a dozer blade and some sheet styrene.  It tilts from travel position to launch position.


Getting back to the opening quote, I've got models for all of those goodies, except one... Guess I need to build some Sgts. with power-mauls.

Wednesday, January 8, 2014

Colossus Mortar Conversion

Wow, it's been a while...

The picture below was my first cut at a Colossus Siege Mortar, very quick and dirty completed in the morning before a tournament.  Kind of loosely based on the Morser Karl Gerat.

 Of course, the more I looked at it, the more that I know that I can do much, much better.  Seeking inspiration, I downloaded a paper-craft model of the Colossus that I found here.

I built the main body of the mortar based on the paper-craft, the breach section and the barrel are plumbing fittings.  I added a pair of recoil dampeners made from tubing and some bits from Sentinel kits.  The mounts are just bits of plastic tubing and a plasticard plate as a base.  The muzzle and breech are courtesy of the plumbing section of the local hardware store. 


 The whole thing slides into one of the generic heavy support chassis I built a while back.


And here's the finished product, ready to rain death on the battlefield.


Tuesday, July 30, 2013

Up-Gunning

Previously, I'd always used my Baneblade as a Hellhammer; now that I've had my first game with the
new book, I've decided that the doubled range and the bigger pie-plate size of the Baneblade is more important than the S10 and AP1 of the Hellhammer.


Fortunately, I'd planned ahead when I orginally built it and magnetized the barrel and the sponson weapons.  Unfortunately, I never painted the barrel, so I had a bit of a challenge in matching the paint to the previously painted turret.  The good news is that a good soot effect hides many sins.


And side-by-side with my Shadow Sword.

Ready just in time for my next Apocalypse game.

Monday, July 8, 2013

Shadow Sword/Storm Lord/ ...

With the new Apocalypse book coming out, I figured it would be a good time to (finally) finish up my Shadow Sword/Storm Lord/etc.

Tuesday, July 17, 2012

Hydra Number 1 Completed

Here's the first of two hydras, painted and ready to sweep the skies of the enemies of the Imperium.
 I covered the design and construction here and here.

I used my usual sequence of paint colors bestial - graveyard - khaki and I used the "Jeff Rust" recipe from Pirate Viking painting for the tracks.

These tracks look so good to me now that I'm going to have to go back and re-do the tracks on all my other vehicles.  


Friday, July 6, 2012

Tank Hunting in 6th Ed Part 2

Continuing from my previous post, lets look at the small blasts like the Devil Dog's Melta Cannon, or the Plasma cannon/Executioner Cannon.  Here are the pictures for hitting Land Raider and Rhino sized targets


So Land Raider sized targets are hit on deviations out to 4" while Rhinos are hit on Deviations out to 3"

So for Landraider sized targets:

Phit = Prob Direct Hit + Prob Deviation * (Prob Dev lt= 4)

For BS3 this is 

       Phit = 0.333 + 0.667 * ((0.03 + 0.06 + 0.08 + 0.11 + 0.14 +0.17) = 0.72

For BS 4 this is

Phit = 0.333 + 0.667 * ((0.03 + 0.06 + 0.08 + 0.11+ 0.14 + 0.17 + 0.14) = 0.81

And for Rhino sized targets:

Phit = Prob Direct Hit + Prob Deviation * (Prob Dev lt= 3)

For BS3 this is 

       Phit = 0.333 + 0.667 * ((0.03 + 0.06 + 0.08 + 0.11 + 0.14) = 0.61

For BS 4 this is

Phit = 0.333 + 0.667 * ((0.03 + 0.06 + 0.08 + 0.11+ 0.14 + 0.17) = 0.72

The Devil Dog is looking better and better -- at 12" you're looking at a 72 % chance of hitting a Land Raider, a 58% chance of Penning it and a 50% chance of killing it outright for an overall Pk of 22%  compared to a Vendetta firing all 3 lascannon with an overall Pk of  12%
Against Predators you have a 61% chance of hitting, a 72% chance of penning and a 50% chance of killing it for an overall Pk of 22%


Thursday, July 5, 2012

Tank Hunting in 6th Edition

One of the big changes from 5th is that blasts now hit tanks at full strength as long as the template touches the hull.  Everybody knows that this makes blasts better at hitting tanks but how much better? I've yet to see anyone quantify this.  I decided to run the numbers for two common targets;  a Land Raider and a Rhino (the Rhino encompassing all of its variants -- Predator, Vindicator, etc)

WARNING MATHHAMMER AHEAD -- If you find that probability and statistics cause you to experience headaches, nausea or ED, you may wish to skip this post.

Friday, June 29, 2012

The Teeth of the Hydra

Finishing up the Hydra conversion.   The basic plasticard shape looks good but a bit bland, I added raised plates and the inevitable rivets to enhance the "Imperial" look.
I used some castings of old-school Rhino hatches to add interest to the top of the turret.

 I think this ones ready for paint.
The Ultramarines Omnibus By McNeill, Graham (Google Affiliate Ad)

Friday, June 15, 2012

Yet another Hydra Conversion

With 6 Ed around the corner and flyers figuring to be a big factor,I've finally decided to take a crack at a Hydra conversion.  Of course, there's no way that I'm going to take the easy route of just slapping a Aegis defense line gun, pedestal and all, onto a chimera -- it just looks wrong.

  Originally, I had planned to do a Half-track along the lines of my Manticore.  However, other folks have already gone there, and done it quite well so I'm going to take a different tack.  A ZSU-23-4 is an obvious choice, but the turret is a bit too modern looking to fit in next to my Medusas, the Ragnarok, and the Manticore.

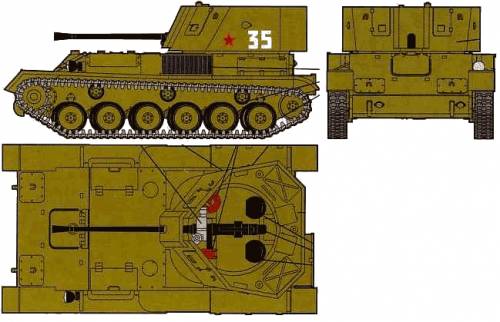
Searching the list of Russian WW II vehicles, I find the ZSU-37, which has the right sort of aesthetics;  with a bit of modification to the front of the turret, the quad autocannon from the Aegis Defense Line should fit nicely.

Or the ZSU-37-2 for that matter:


In the end I opted for the ZSU-37-2.  First I created the following templates, I left them on the original drawing to illustrate the process

Here's the basic turret, flooring installed in case I decide to make the interior visible,  The magnet on the rear holds a radar dish from the Apocalypse command sprue in place.

 I cut down the pedestal for the guns to fit the space, some what trial and error.
 For the chassis, I obtained a basic chimera chassis from The War Store,  I built in the ability to slide an insert into the chassis.

The turret will mount to this box, with a Razorback top hatch.   I use a 25 mm base glued to the bottom of the turret as the pivot  


Still need to add some details to the turret, but here's the general idea:


Thursday, April 5, 2012

Ragnarok Revisited

A while back, I built a Ragnarok style Leman Russ.  I followed the time honored tradition of starting with a Chimera hull, double-tracking it and adding a big square KV-2 style turret.  I used a few side armor plates from the Baneblade as turret sides etc.  It looked OK but fell a bit short of my expectations in terms of appearance.


I subsequently rebuilt the hull but left the turret largely the same, only adding some green-stuff 'welds'.  Now the riveted Baneblade plates just looked out of place with the welds.  This time I cut out the riveted plates, replaced them with plain plasticard and re-did the 'welds'.  Much better.

I replaced all of the surface details on the top of the turret and added 2 Baneblade Periscopes.  Also, at this time, I rebuilt the Mantlet, to give the tank a beefier feeling.


Since I planned to use this tank primarily as a Demolisher/Executioner, I wanted to give the sides a more heavily armored look than just Chimera sides, I decided to add armored skirts, using Dave Taylor's excellent Vostroyan style Ragnaroks for inspiration.  The skirts are two layers of plasticard plus some plasticard 'C'-channel as framing.


Finally some details -- the steps on the side are made from C-channel cut to about the same length as the steps on the door of a Rhino.  The 'Iron V' insignia for Vostroya are castings as I outlined in a previous post.

I primed the model black, then used a brush to get any spots that the spray-can missed, then I did a high-angle, light over-spray to pre-highlight.  The main color is base-coated with bestial brown followed by successive dry-brushes of Graveyard Earth, and successively lighter colored dry-brushes up to Kommando Khaki.  I then washed with Devlin Mud, and finished with a final dry-brush of 50/50 Khaki and Skull White.
The gold bits were base-coated with Tin-Bitz, followed by Shining Gold and Burnished Gold, then washed with a mix of Dark Angels Green and Hawk Turquoise, and a final highligh of Burnished Gold.

 The tracks were painted using the 'Jeff Rust' method over at Pirate Viking Painting.  The lenses were painted following the formulae in "How to Paint Citadel Tanks'.  Here's the finished product: